2021年12月重新搭建主页,遇到了一些新问题,因此更新一下这篇笔记。
用Hexo在本地搭建主页
安装
首先需要安装node.js,从官网下载安装。(同时会安装npm)。
建议先安装NVM (Node Version Manager),然后再用NVM安装指定版本的node。
开始的时候直接安装了最新版的node (v16.13.1),然后在使用hexo的过程中遇到了各种问题,包括运行时报warning,编译出的html文件为0KB等问题。在网上查了之后发现是node版本过高的原因,因此后面首先安装了NVM,然后使用以下命令安装/控制node版本。
$ nvm list  //查看目前已经安装的版本
$ nvm list available //显示可下载版本的部分列表
$ nvm install 10.15.0 //安装指定的版本的nodejs
$ nvm use 10.15.0 //使用指定版本的nodejs,这个命令需要管理员权限
$ npm install -g cnpm --registry=https://registry.npm.taobao.org  //使用淘宝镜像
在node.js的官网查看长期维护版本,找到其中最早的是12.22.7,到期时间为2022-04-30,为了保险先用的这个,后面这个版本到期了可以用更新的版本。
之后利用npm安装hexo
$ npm install -g hexo-cli
查看hexo版本
$ hexo -v
本地搭建
接下来使用hexo在本地搭建的步骤简单来说就是
$ hexo init <folder>
$ cd <folder>
$ npm install
之后就可以用
$ hexo server (hexo s)
进行本地测试了。
在这里遇到一个问题,在开启server之后用浏览器访问localhost:4000显示空白页面,后台报错 No layout。
最后发现这是因为不知道为什么初始化的时候没有自动下载theme里的默认theme,也就是landscape。 重新在hexo的themes网站上找到landscape的github地址,克隆到themes目录下
$ git clone https://github.com/hexojs/hexo-theme-landscape themes/landscape
这里文件夹的名字要跟网站配置文件 _config.yml 中的 theme: landscape 这一行相同。
另外这个themes网站上还有各种风格的主题,使用方法也一样,先克隆岛themes目录下,然后修改网站配置文件 _config.yml 中的 theme:的值即可。
使用以下命令创建新文章:
$ hexo new [layout] <title>
其中layout默认为post,会保存在source/_posts路径下。
可选项:插入图片
官网上对于插入图片的说明中列举了几种方法,比较简单的是将图片统一放在source/images文件夹中,然后使用类似的方法访问。
另外还有一种可以将不同文章的图片放在对应文章的文件夹下,方法是在_config.yml文件中设置post_asset_folder: true。
这样在使用hexo new [layout] <title>命令生成新的文章的同时,会在source/_posts目录下生成同名的文件夹,用于保存想要插入的图片。
但是这样似乎仍然无法成功插入图片,根据这篇教程,在修改上述参数之后,还需要安装对应插件:
$ npm install hexo-asset-image --save
然后将/node_modules/hexo-asset-image/index.js中的内容替换为以下代码:
|
|
之后,在source/_posts路径下对应的文件夹中放入想要插入的图片,然后使用如下命令在文章中插入图片:
{% asset_img [class names] slug [width] [height] [title text [alt text]] %}
例如:
{% asset_img example.jpg This is an example image %}
使用NexT主题
NexT的下载与配置
进入上面建立的blog文件夹,用如下命令获取next主题到themes文件夹下。
$ cd <folder>
$ git clone https://github.com/next-theme/hexo-theme-next themes/next
进入next文件夹中选取合适的版本。使用最新版(v7.8.0)时报错(Unhandled rejection Template render error:),将版本降低到v7.0.0之后正常运行。
$ cd themes/next
$ git tag
$ git checkout v7.0.0
关于next文件夹下的_config.yml配置可以参考官方文档和这篇教程。
需要注意的是官方文档中有些信息不是最新的,例如根目录下的_config.yml文件中的语言language设置,新版本中文使用的是zh-CN,但官网上仍然写的是旧版本的zh-Hans。
可选项:设置动态背景
NexT 6.0以上的版本下在themes/next/_config.yml中直接设置canvas_nest: true无法使动态背景生效,解决方法如下:
$ cd themes/next
$ git clone https://github.com/theme-next/theme-next-canvas-nest source/lib/canvas-nest
然后重新编译即可生效。canvas_nest下的属性说明如下:
canvas_nest:
    enable: true
    onmobile: true # display on mobile or not
    color: '0,0,0' # RGB values, use ',' to separate
    opacity: 0.5 # the opacity of line: 0~1
    zIndex: -1 # z-index property of the background
    count: 99 # the number of lines
将本地主页推送到Github
接下来首先要在github上创建一个repo,可以参考一步步在GitHub上创建博客主页-最新版,其实跟创建一般的repo区别不大,主要是命名必须按照 username/username.github.io 的格式。 这里只需要做到建好repo就行,后面的步骤会由hexo自动完成。当然,也可以按照这个教程先建立一个由github定制好风格的主页。
修改网站配置文件 _config.yml,其中 url: 一项可以填刚刚开通的github主页 username.github.io,但是这里后面要改成申请的独立域名。
配置好之后运行
$ hexo generate
$ hexo deploy (hexo d)
就可以将该博客推送到刚刚申请的repo中了。然后可以通过username.github.io对其进行访问。
在执行 deploy 的时候遇到了报错 error deployer not found:github,运行
$ npm install hexo-deployer-git --save
之后解决了该问题,这个问题似乎是3.0之后的版本才出现的问题,可能换到2.x版本也能解决。另外顺便说一句hexo更新到3.0之后,deploy的type的github需要改成git,这里打错了可能也会出现相同问题。
在Namecheap上为Github设置DNS
这一部分讲的是怎么在Namecheap上将自己申请的域名和Github上的域名关联起来,参考的主要是Setting the DNS for GitHub Pages on Namecheap。
首先需要有一个Namecheap上的域名,如果是学生的话可以在Github Student Developer Pack里申请到一年的免费域名,否则只能花钱买了。
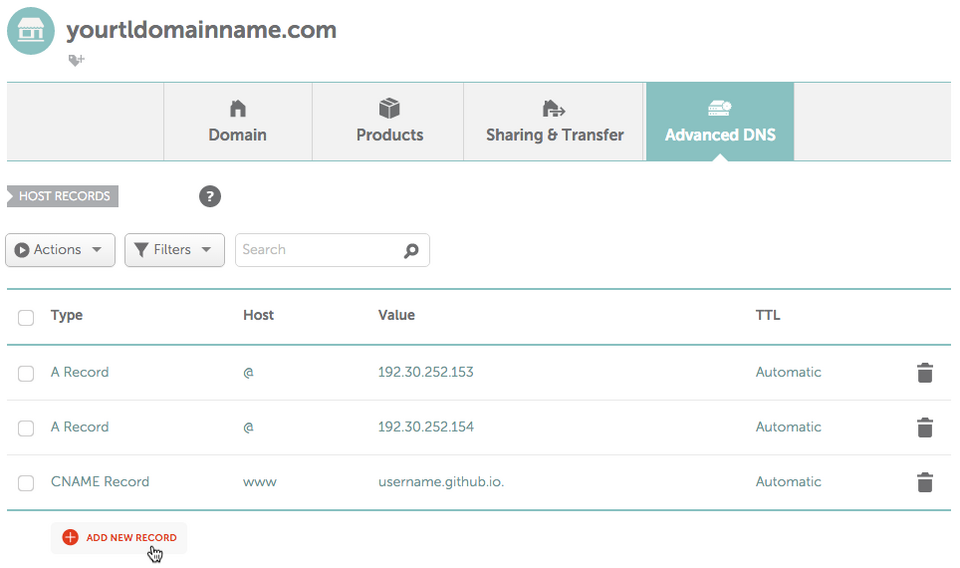
进入Advanced DNS中(先点左边的Domain List,选择你的域名,点击manage,再点右边的Advanced DNS),这里需要添加3条records。
- 点击
ADD NEW RECORD,选择A Record类型,Host填@,Value填192.30.252.153。 - 再添加一条
A Record类型,Host填@,Value填192.30.252.154。 - 添加一条
CNAME Record类型,Host填www,Value填刚才建好的github上的博客网址username.github.io.(注意最后有个点)。
更新:
目前github的IP地址已经更改,见官网说明。
使用上面的地址更新时会受到邮件 The custom domain for your GitHub Pages site is pointed at an outdated IP address. You must update your site's DNS records if you'd like it to be available via your custom domain.
因此上面的1,2两条IP地址需要更新为以下4个:
185.199.108.153
185.199.109.153
185.199.110.153
185.199.111.153
至此Namecheap上的DNS就设置完了(这里DNS的更新需要等待一段时间才会生效),还需要在Github上设置一下custom domain name。 比较推荐的方法是在本地的source文件夹里加一个名为CNAME的文件,内容只有一行,为自己的域名。然后再generate并deploy就可以了。这时候打开github里刚为博客建立的那个repo,可以看到根目录下也多了一个相同的CNAME文件。而打开Settings可以看到在Github Pages里的Custom domain这一项已经填入了CNAME里的域名。现在访问自己的域名时打开的就是一开始创建的个人博客了。